Beach-Style Round Epoxy Coffee Table: A DIY Guide
Advertisements
Bringing the serene, sun-bleached beauty of the coast into your living space is a timeless design ambition. A beach-style round epoxy coffee table serves as a stunning centerpiece that captures the essence of ocean waves, sandy shores, and natural textures. Unlike purchasing a finished piece, embarking on a DIY project allows for complete customization, from the choice of wood grain to the color and depth of the ""water"" epoxy. This comprehensive guide will walk you through the entire process, from selecting materials to applying the final polished finish, empowering you to create a functional work of art. The key to success lies in meticulous preparation, patience during the curing process, and embracing the creative flow of working with epoxy resin.
1. Project Planning and Design Considerations
Before purchasing any materials, careful planning is essential. This phase determines the project's feasibility, cost, and final appearance.
1. Size and Proportion
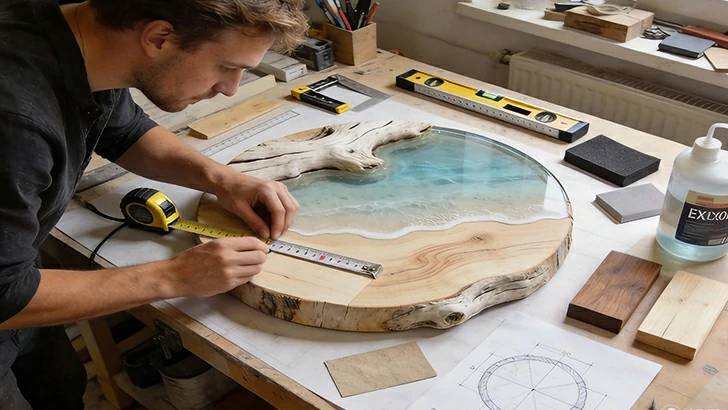
Decide on the diameter and height of your table. A common diameter for a round coffee table is between 90cm (36 inches) and 110cm (44 inches). The height typically ranges from 40cm (16 inches) to 50cm (20 inches). Consider the scale of your sofa and room to ensure the table is proportionate.
2. Wood Selection and Preparation
The live edge or natural wood slab is the foundation. Opt for wood like walnut, oak, or maple with interesting grain patterns. The slab must be completely dry (kiln-dried is best) to prevent warping. It needs to be planed, sanded, and its edges may be trimmed to create a stable base for the river-like epoxy pour. For a beach style, a lighter wood like ash or pine can mimic bleached driftwood.
3. Epoxy Type and Quantity Calculation
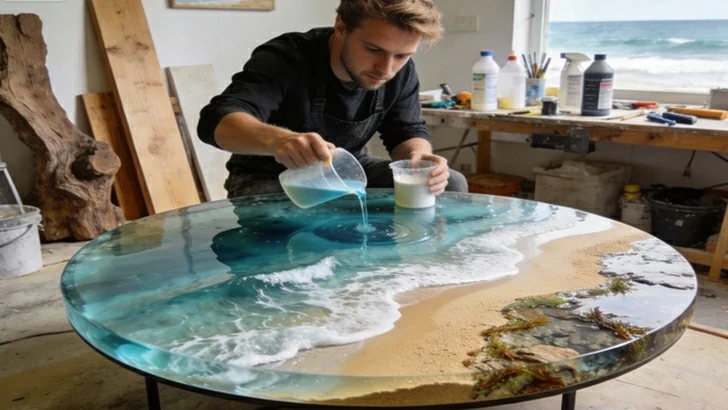
For deep pours (like a ""river"" or ""ocean"" effect), you must use adeep-pour casting epoxy resin. This type cures slowly with minimal heat generation, preventing bubbles and cracks. Calculate the volume needed (length x width x average depth in cm, then divide by 1000 for liters) and always purchase 10-15% extra to account for spills and miscalculations.
Advertisements
2. Essential Tools and Materials
Gathering all necessary items beforehand creates a smooth workflow. Safety equipment is non-negotiable when working with epoxy.
1. Primary Materials
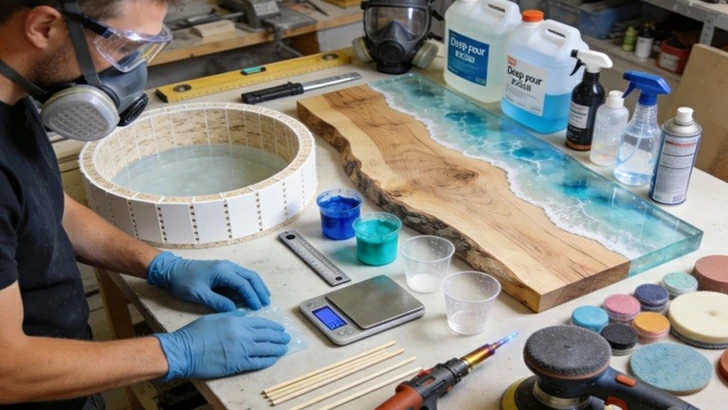
This includes the prepared wood slab, deep-pour epoxy resin and hardener, epoxy pigment pastes or dyes (in blues, teals, and white for ocean effects), and sealing agents like clear spray lacquer for the wood.
2. Tools for Construction and Pouring
You will need a circular mold or form (often built from melamine board) to contain the epoxy, a leveling tool, a digital scale for precise epoxy mixing, and multiple mixing cups and sticks. A heat gun or propane torch is crucial for removing bubbles from the surface.
3. Safety and Finishing Equipment
Essential safety gear includes nitrile gloves, safety goggles, and a respirator mask rated for organic vapors. For finishing, have an orbital sander with grits from 80 to 2000, polishing compounds, and a buffing pad attachment ready.
3. Building the Mold and Preparing the Wood
A leak-proof mold and perfectly sealed wood are critical to prevent a disastrous, messy epoxy leak.
1. Creating the Round Mold
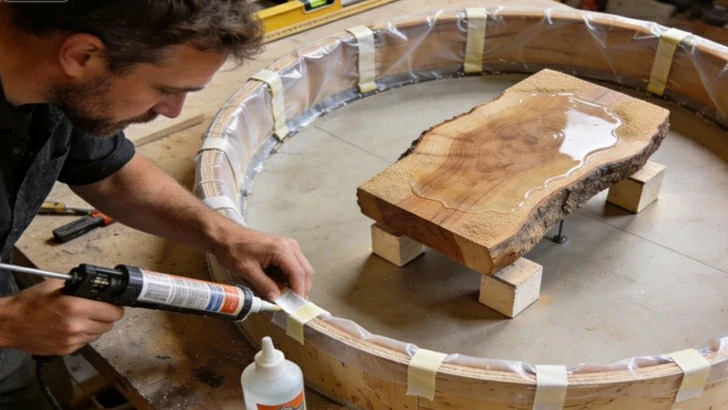
Construct a round form slightly larger than your intended table diameter using a flexible, non-porous material. A common method is to use a strip of flexible plastic or sealed plywood bent into a circle. Seal all interior seams with silicone caulk and tape to ensure it is absolutely watertight. The mold must be placed on a perfectly level surface.
2. Sealing and Positioning the Wood
The wood must be sealed with a thin coat of clear epoxy or a specific sanding sealer on all surfaces that will contact the liquid epoxy. This prevents air bubbles from escaping the wood and becoming trapped in your pour. Once sealed, suspend the wood slab in the center of the mold using small blocks or by attaching temporary legs, ensuring it is level and stable.
3. Final Pre-Pour Checks
Double-check the level of your workspace and the mold. Ensure the room temperature is stable (typically 21-24°C or 70-75°F as per epoxy instructions) and humidity is low. Clean the mold's interior with isopropyl alcohol to remove any dust.
Advertisements
Advertisements
You May Have Missed

Flight attendants share their most memorable travel experiences

Time Travel Through History With These Vintage Photos
